Device Management
This section explains how to interact with devices generally: how to list detected devices, how to connect to a device, how to change settings of a device, and how to store profiles.
Connecting Devices
The default screen of the Data Acquisition window is the device connection screen. It is displayed in the main area. It is always possible to return to this screen by pressing the Add hardware button at the bottom of the settings window.
There are two sections: at the top there is the *Connect Profile* section, and below is the Connect Directly To Device section.
Enumerating Devices
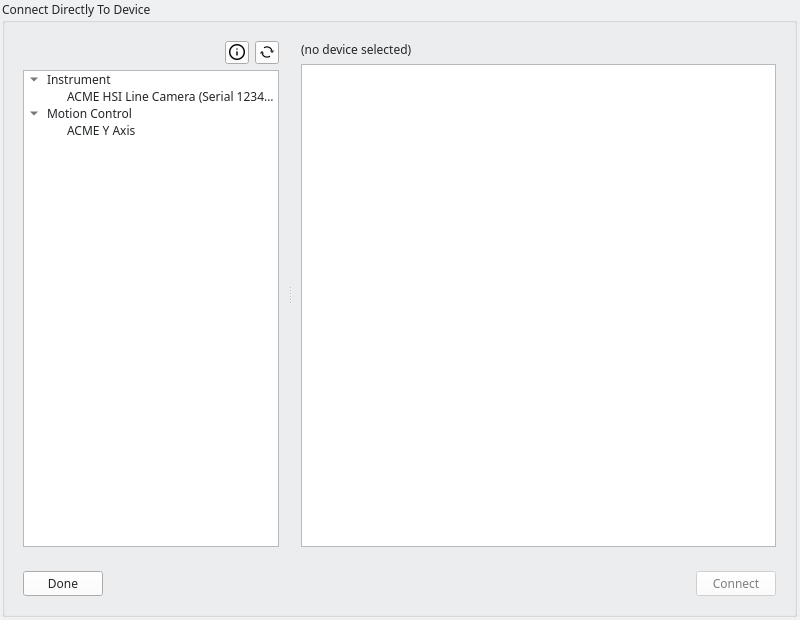
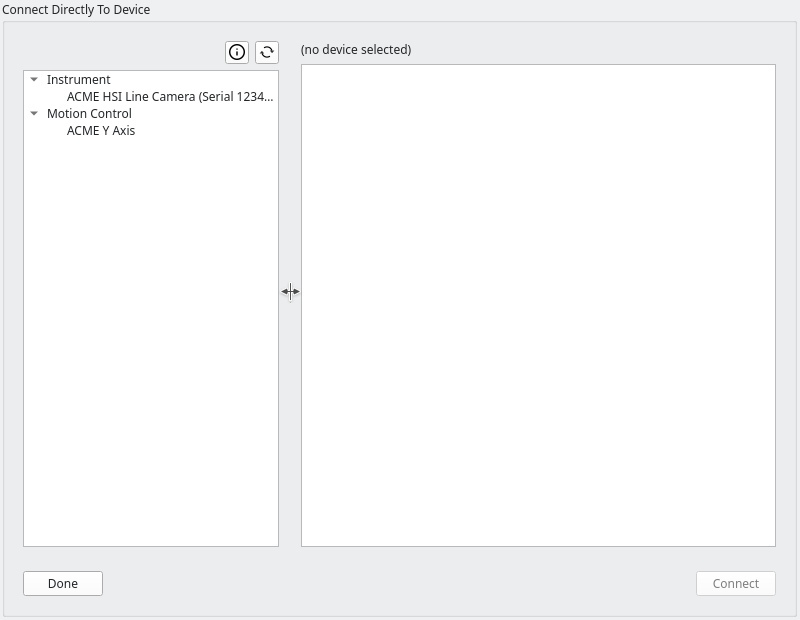
The Connect Directly To Device section has two areas: on the left there is a list of devices that were detected, on the right the connection settings of the selected device will be displayed. The user has the option of changing the relative sizes of the area by pressing the left mouse button between the areas where the cursor changes, and dragging the mouse with the button pressed to the desired arrangement:
Device List
There are two methods by which devices can appear in the list of devices on the left part of the screen:
Devices that are detected: for many types of devices (most notably most cameras that are connected via USB or cameras that support the GigE Vision protocol) fluxTrainer can easily detect if one or more of the corresponding devices is plugged into the system, and create an entry in the list for each device that was detected.
For these types of devices, if they are unplugged, the entry in the list will typically disappear (this might take a couple of seconds), and if a new such device is plugged in, it will automatically appear in the list (though it also may take a couple of seconds for it to appear).
If only drivers for these types of devices are installed with fluxTrainer, and no device is currently plugged in, the device list may be completely empty.
Devices that always appear: some devices can’t be detected unless a connection attempt is made. This is often the case with devices that use a traditional serial port to communicate with the compter. (The serial port may be connected via USB in more modern systems, but the underlying communication protocol will still be the same.) But it can also be the case for devices where the user must first specify some settings before they can be connected to. For example, a network device that does not support automatic discovery may require the user to provide the IP address of the target device to be able to connect to it.
While it is possible to determine which serial ports are currently available in the system, it is impossible to detect which specific device is present without attempting to perform communication over the serial port itself.
For those types of devices the driver will always create an entry (whether a device is plugged in or not), and the only definitve method of determining whether such a device is actually plugged in is to attempt to connect to it.
Some drivers for such devices also support probing. For example, if a device can be accessed via a serial port, a driver might allow the user to probe for the device by attempting to talk to the device through all serial ports present in the system. This works by providing the user with the option to choose Automatic when selecting the serial port, in which case attempting to connect to the device will perform this probing algorithm. (If no device of the chosen model can be reached behind any serial port of the system, the connection attempt would fail in that case.)
Irrespective of whether they can be detected automatically, or must be explicitly connected by the user, fluxTrainer supports a variety of types of devices that all fulfill different functions:
Instrument Devices: this encompasses any type of device supported by fluxTrainer that can measure data. Typically this will be a type of camera, but other type of instruments, such as spectrometers, are also supported. This is the main type of device a user will interact with.
How to interact with instrument devices will primarily be explained in the Calibration, Recording, and Player sections.
Motion Control Devices: in many measurement setups there may be devices that perform a physical motion to support the measurement.
Most commonly there are linear axes that allow the user to move a stage that holds the object that is to be measured so that it travels beneath a line camera. This allows for an entire object to be scanned with a line camera.
There are also linear axes that allow the adjustment of the height of the camera above the measurement sample, so that the user may ensure that the sample is in focus.
A full discussion on how motion control devices are integrated into fluxTrainer can be found in the Motion Control Devices section.
Light Control Devices: these devices allow fluxTrainer to take control of the lighting in the system. A light control device is either a device that can turn a light source on and off (most common) or a device that can block light from entering the camera (i.e. a type of shutter). All light control devices allow the user to turn the light on and off, but some may also allow the user to change the intensity of the light.
A full explanation of the behavior of fluxTrainer when light control devices are attached can be found in the Light Control Devices section.
Above the device list there are two buttons:
The
driver information button. This opens a new window that shows information about all loaded drivers. (See below.)
The
button. Clicking on this button will empty the device list, unload all drivers, and then erstart the device enumeration process. This button is useful if a device has been connected and the corresponding driver is stuck so it doesn’t appear automatically.
Next to the icons there may also be either a yellow triangle to
indicate that at least one driver has issued warnings. Click on the
![]() icon to open the
driver information
window to view these errors and/or warnings.
icon to open the
driver information
window to view these errors and/or warnings.
The red octagon can also appear next to the icons ot indicate that
the currently selected device has since been disconnected from the
system. For example, a USB camera is connected to the system, the
user selects it in the list (but does not connect to it yet), and
then accidentally pulls the USB cable. In that case a red octagon
will appear next to ![]() and
and ![]() icons to
indicate this. Once the user has selected another device the
previously selected device will be removed from the list, which is
what happens to devices that are no longer plugged in when they are
not selected.
icons to
indicate this. Once the user has selected another device the
previously selected device will be removed from the list, which is
what happens to devices that are no longer plugged in when they are
not selected.
Connection Settings
On the right hand side of the device list there is the are where connection settings for each selected device are shown. Connection settings are parameters that influence how the device is being connected to. There are three major types of connection settings:
Settings that select how to find the device. For devices that cannot be automatically detected, this provides the user with the opportunity to tell fluxTrainer how the device is attached to the computer.
For example, if a device is reachable via a serial port, this allows the user to indicate which serial port the device has been connected to. Or if a network device without automatic discovery support is to be accessed, the user might need to enter an IP address of the device.
Calibration information for the device, so that fluxTrainer can adequately make use of the device. The requirement to provide a calibration file is most common for instrument devices (such as HSI cameras), but other devices may also have such files. Some devices may store the calibration information on the device itself though; a calibration file may not be required in that case. (And it may not even be possible to specify one for those types of devices.)
Settings that affect the behavior of the device once connected, but can only be set once. This is very uncommon, but some drivers may provide this as additional options to influence the behavior.
When the user is required to provide a file as a connection setting for the device, the file selection parameter will look like this:

Clicking on the ... button will open a new window where the user
can choose an appropriate file. Clicking on the button with the left
arrow next to it will clear the current entry, as if no file had ever
been selected. (The latter is useful if providing a file to a specific
device is optional, and the user wants to return to connecting to the
device without a previously specified file.)
Which parameters are available for each device will depend on the device type. Some devices may have no connection parameters at all.
Below the device list and the devices’ connection parameter list, there are two buttons:
The Done button on the left closes the device connection screen. This will only work if there is at least one device connected. If devices are connected manually the user must use this button to proceed once all devices have been connected.
The Connect button will attempt to connect to the currently selected device with the current connection settings.
Pressing this button will not close the device connection screen. This is because a user may want to connect more than one device at the same time. Please use the Done button after having connected to all chosen devices.
Driver Information
When clicking on the ![]() icon above the device list, the
driver information window will open:
icon above the device list, the
driver information window will open:
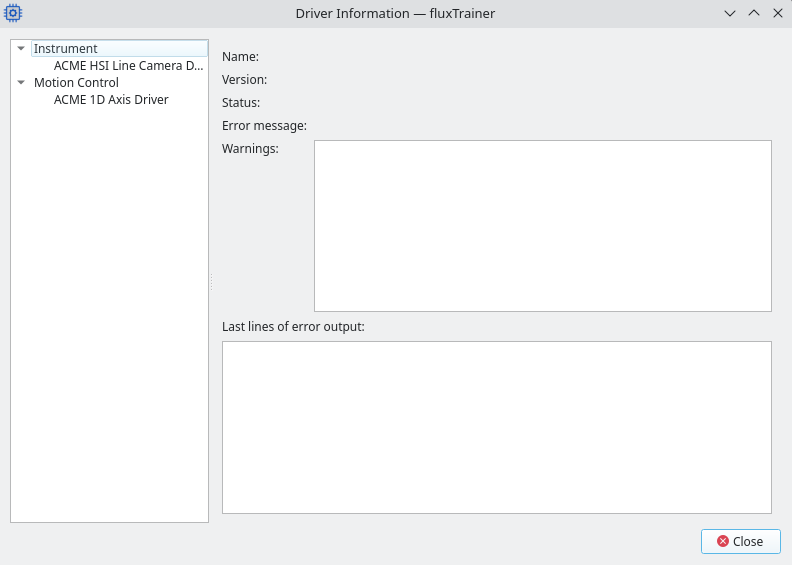
On the left there is a list of all drivers that fluxTrainer could find. On the right details for the selected driver will be shown.
Name
A human-readable name of the driver. If the driver could not be loaded
at all, the name of the DLL file on disk will be shown instead.
Version
A self-reported version string of the driver.
Status
What the current status of the driver is.
Error Message
If the driver had an error, the message of that error will be displayed here. (A driver not finding any devices is not considered to be an error.)
Warnings
Some drivers may produce warnings that will be displayede to the user. For example, if a driver detects that some required system component (such as a Windows kernel driver) is not installed on the system, the driver might issue a warning that will be displayed here.
Last lines of error output
Sometimes a driver may crash instead of failing with a useful error message. But sometimes there may be additional debug information that the driver has output just before crashing. In that case this output may help the user to determine what went wrong.
Connecting Devices
To connect to a device press the Connect button in the lower-right corner. This will immediately add a new area to the Settings list that indicates that a connection attempt is currently in progress for the device:
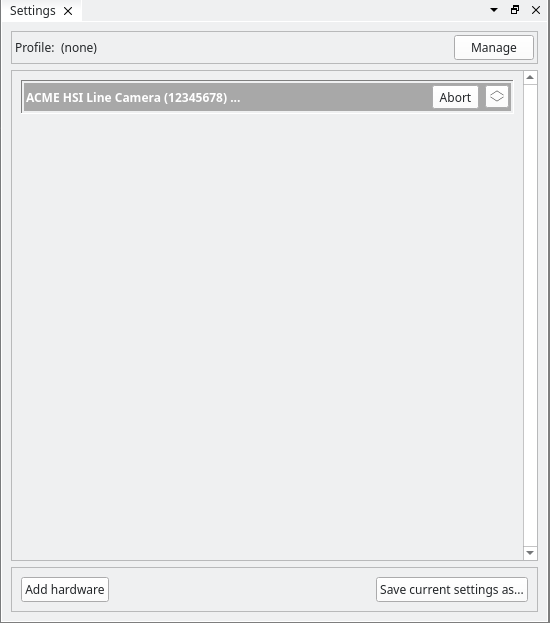
There are two buttons to be seen here: Abort, which will abort the
connection attempt, and the toggle button, ![]() , which
will expand/contract the device box.
, which
will expand/contract the device box.
Warning
Aborting the connection attempt is done by forcefully terminating the driver process that has been started to connect to the selected device. This may terminate the process while it is in the middle of performing an action on the device. This may have side effects on the device if performed at an inopportune time.
Only abort a connection attempt if it is clear that the driver has hung.
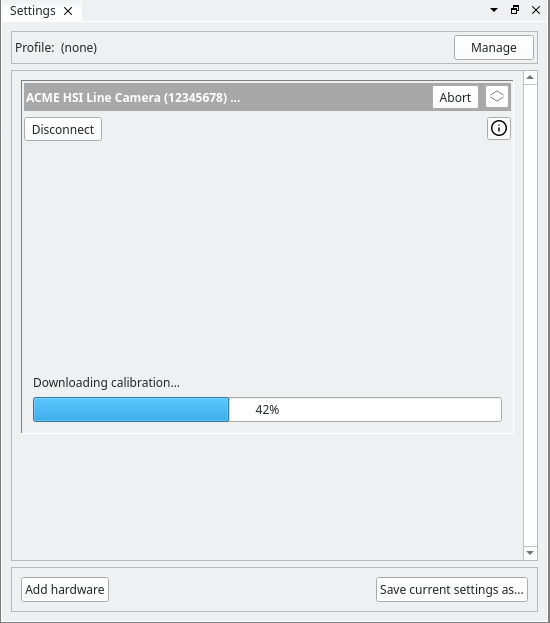
Some drivers may also provide progress information about the connection
progress. In that case fluxTrainer will automatically expand the device
box (as if the toggle button, ![]() , had been clicked), to
show a message and optionally a progress bar indicating the connection
progress:
, had been clicked), to
show a message and optionally a progress bar indicating the connection
progress:
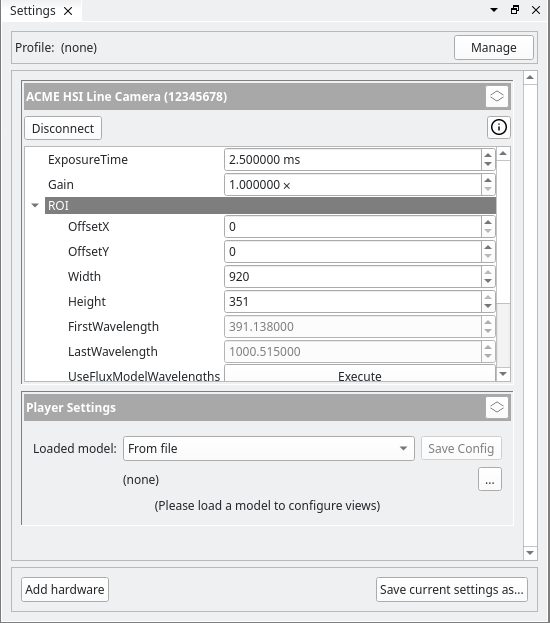
Once the device has been connected, the device box will automatically be expanded (if it wasn’t already), and show the settings pertaining to the device:
However, a connection attempt to a device may not be successful. If an error occurs during the connection process, at first an error window will open with the erorr message:
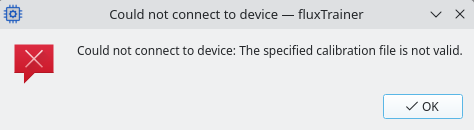
The specific error message will be generated by the driver of the device.
Additionally, the device box will now show the error message as well:
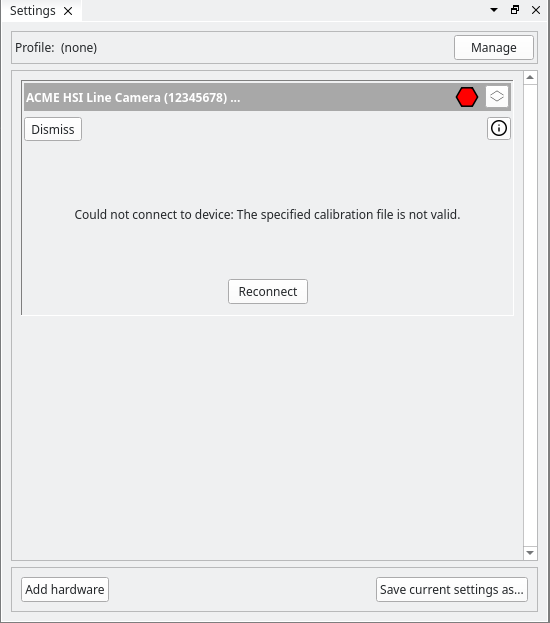
There are now two buttons shown in the device box:
When clicking on Dismiss the device box is removed and the device no longer appears in the device list.
When clicking on Reconnect the connect device screen will be opened again. This button does not attempt reconnection immediately, but the user may perform the connection attempt again from the list of available devices.
Only one device of specific types
There are some device types that the user may only connect one of. For example, the user may only connect a single instrument device. When attempting to connect to another instrument device while there is already one connected, an error message will appear.
Similarly, while it is possible to connect multiple motion control devices, they must all be of different types. It is possible to connect both a Y axis and a Z axis motion control device, but it is not possible to connect two Y axis devices.
On the other hand, there is no theoretical limit on the number of light control devices that can be connected to.
Managing Connected Devices
When one or more devices are connected they will appear in the Settings dock widget. Each device will have its own box that the user may change the settings in. The boxes are arranged vertically and the user may need to scroll the area to see all available devices:
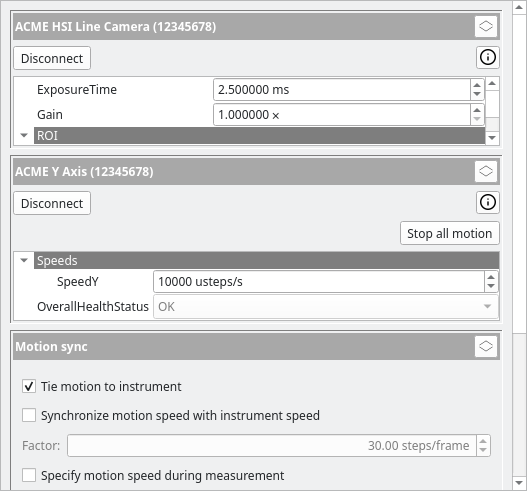
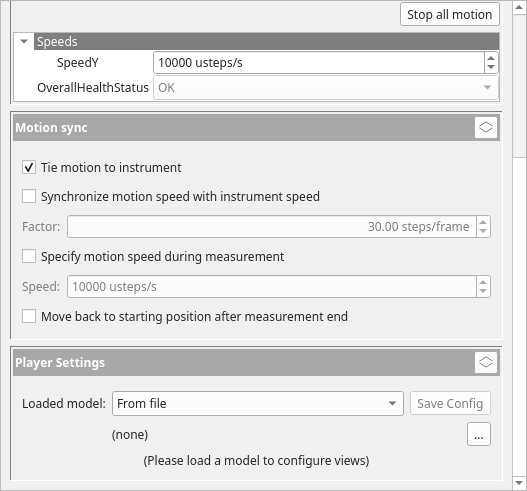
In addition to boxes related to specific devices, the Settings area may also contain boxes that configure other things related to devices, possibly only available when multiple devices of specific different types are connected.
All boxes in the Settings area are sorted according to their type. The following sort order is used:
All devices that are still in the process of being connected
Instrument devices
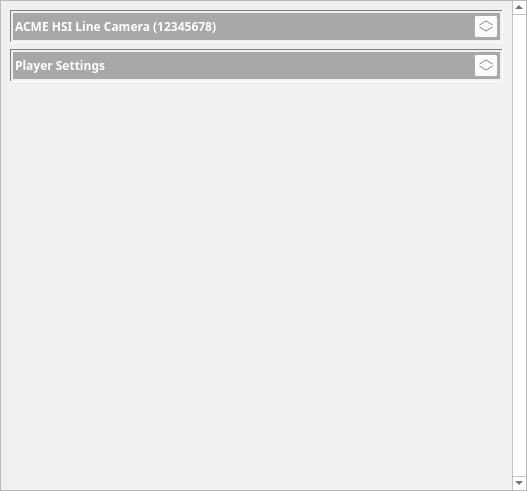
Boxes that are currently not of interest to the user may be toggled
closed with the ![]() button:
button:
Device boxes have two buttons visible immediately below the title bar of the box:
The Disconnect button will disconnect the device. At first a disconnect request is sent to the driver, and if the driver does not respond within 5 seconds, the driver process will be terminated. Once the device has disconnected, its box will disappear.
The device information button,
Some devices may also have subdevices. For example, a camera with an integrated light source could both contain an instrument device, as well as a light control device. One would only select a single device to connect to, but multiple device boxes would appear in the device list after the connection has been successful. The user can interact with subdevices in the same manner as if they were devices that were directly connected to, with the exception of the Disconnect button, which is only available for the primary device, and clicking that will also disconnect all subdevices.
Changing Parameters
Below the Disconnect and device information buttons the parameters of the device will be shown. These parameters will influence how the device behaves. Parameters are specific to the device, but many devices of the same type will have similar or identical parameters. The most common parameters of each device type (instrument, motion control, etc.) will be explained in the corresponding sections.
Sometimes a user may not be able to edit a specific parameter, but the device driver does not support the value that was entered. In that case the current value is re-read and an error message is displayed beneath the parameter that the user attempted to edit:
Sometimes error messages that occur when editing parameters also indicate issues with the device, especially because some drivers do not properly detect device disconnections.
In addition to the parameter list there may also be actions specific to the device’s type shown above of the list of parameters. These will be explained in the sections relating to the individual device types.
Information About Devices
Clicking on the device information button, ![]() , in a
device box will open the device information window for that device:
, in a
device box will open the device information window for that device:
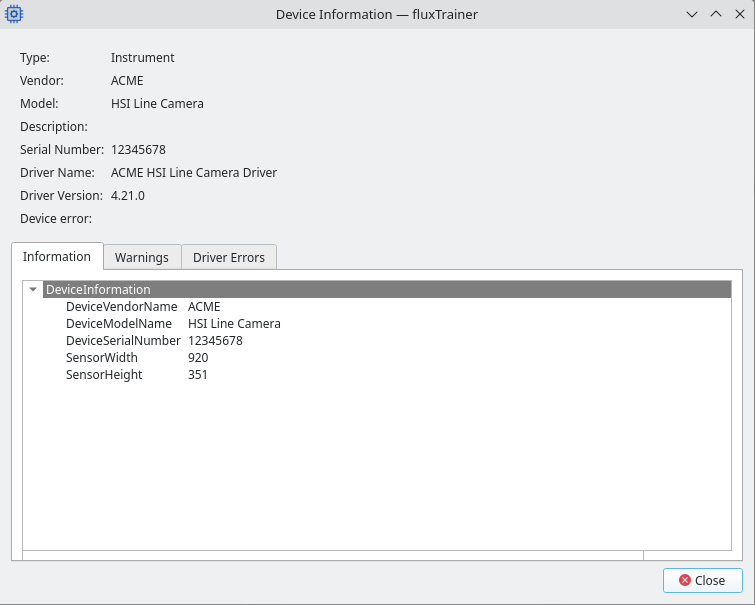
At the top there will be various strings that describe the device.
Type: the type of device (instrument, motion control, light control, etc.)
Vendor: the manufacturer of the device
Model: the model of the device
Description: (optional) a human-readable description of the device
Serial Number: (optional) the serial number of the device
Driver Name: the name of the driver. This will be the same as the driver name displayed in the driver information window during device connection.
Driver version: the version of the driver. This will be the same as the driver version displayed in the driver information window during device connection.
Device error: if the device is currently in an error state (for example because it was unplugged while still connected to fluxTrainer), that error message will be shown here
Below there are three sections:
Information: this contains a list of device-specific parameters that provide more information about the device in question. What information is provided will depend on the specific device driver.
For instrument devices: this information will also be stored in recordings made with that instrument device (e.g. camera).
Warnings: some devices may issue and retract warnings to fluxTrainer. Those warnings will be displayed here. A warning could for example be that a device has exceeded the specified temperature operating range.
Driver Errors: some device drivers may produce debug output when they are active, and the debug output is captured by fluxTrainer. If present it can be recovered here. This might be useful when diagnosing problems with a specific device.
Irrecoverable Errors
Sometimes a device may encounter an irrecoverable error. The most common situation is when the device has been unplugged while still being accessed from fluxTrainer.
If that happens, fluxTrainer will first display an error message window showing the error message from the driver:

After dismissing the error message the device box will also change to display the error:
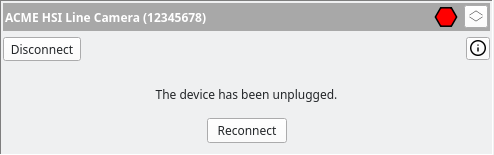
A red indicator is now displayed next to the toggle button to indicate an error. As with connection errors there is now a Reconnect button to allow the user to re-open the device connection screen.
The user must still press the Disconnect button of the device to remove the device from the list of currently active devices.
If an irrecoverable error occurs the only method to access the device again is to connect to it again from the device connection screen.
Recoverable Errors
Some devices may also encounter recoverable error conditions.
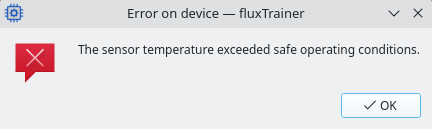
For example, if a physical emergency stop button of a motion control device has been pressed, then the device cannot continue while that button is still pressed, but once the button has been released again, it is possible to recover from that error state.
Similarly, some cameras may want to shut down their sensor when its temperature exceeds a safe operating range, but the electronics board of the camera might still be in communication with the computer. Once the sensor temperature has dropped to a reasonable level again, it may be possible to restart acquisition with the camera without having to connect to it again.
If a device notifies fluxTrainer of a recoverable error, an error message will be shown to the user:
After dismissing the error message the device box will also change to display the error:
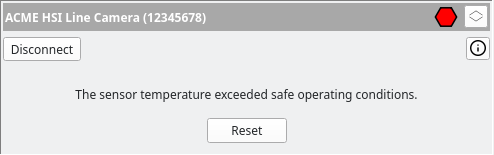
This is very similar to an irrecoverable error, but the main difference is that there is no Reconnect button, but a Reset button in the device box. It is up to the user to solve the issue that caused the recoverable error (for example by releasing the emergency stop button, or by ensuring that the devices temperature sinks again), and then pressing the reset button. The device’s driver will then check whether the condition still persists (or if a new condition has arisen in the mean time), and if everything is successful, the device will be operational again.
If there still is a recoverable error when pressing the Reset button (for example the emergency button could still be pressed), the device will remain in the recoverable error state and show an error message window that the error state could not be reset.
If an irrecoverable error occurs while the device already was in a recoverable error state, then the Reset button disappears and the Reconnect button appears.
Not all drivers will have recoverable error states; many drivers don’t.
Profiles
When connecting to a device, the settings of the device are either going to be the default settings of the device and/or driver, or at most the last settings configured for that device if it hasn’t been powered off since the last connection.
Many measurement setups will often require the user to use the same set of parameters (which are often not the device defaults) to perform optimal measurements.
Profiles allow the user to store the current settings of all connected devices, i.e. the current state of the data acquisition window, on disk, and restore that state the next time fluxTrainer is started.
A profile will contain the following information:
- All devices that are currently connected
The connection settings of each device
The settings of each device
The current referencing mode set in the calibration view
The calibration settings used to configure the current instrument
The white reference reflectivity currently configured
The current reference measurements (optional, must be selected explicitly)
The current motion sync settings (if applicable)
The current 2D recording settings (if applicable)
The selected Pan/Tilt axis that is used as the movement axis for recordings
Creating Profiles
To save the current settings in a profile one may use the button Save current settings as… at the bottom of the Settings area:
This will open the Save settings as profile window:
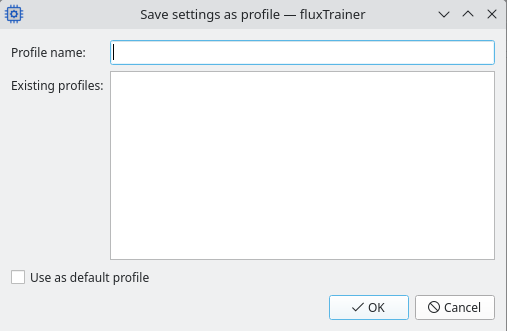
The user can either a new name for the profile, or select the name
of an existing profile. All profile names must be unique; if
the user enters the name of a profile that already exists (or selects
a profile from the list of existing profiles), they will be asked if
they want to overwrite that profile when saving the current settings
under that name. Profile names are case insensitive. test and
Test will refer to the same profile.
The user additionally has the option to make the newly created profile the default profile. The default profile will be the one automatically selected when opening the device connection screen when the data acquisition window is first opened.
If no profile exists and the first profile is created, it will automatically become the default profile, even if the option is not set by the user.
Once the profile has been saved, the top of the Settings dock widget will change to indicate the name of the profile used for the current settings:

Viewing Profiles
At the top of the Settings dock widget the user may click on the Manage button to open the Profile Manager window. This is always possible, even if no device is currently connected.
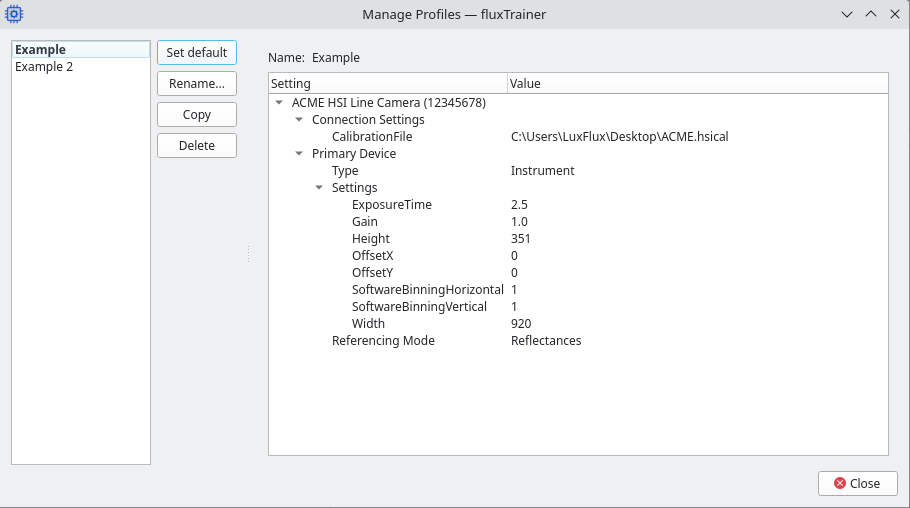
On the left side of the window the user can select a profile from the list of profiles that have previously been saved. The default profile will be bold.
Next to the list of profiles there are several actions that the user may take (see below).
On the right side there is an overview of all of the settings that have been saved in the profile. These settings will be applied when that profile is connected to.
Changing Default Profile
To change the default profile, select the profile that should be the new default, and click the Set default button next to the profile list. This will now make the selected profile the new default profile.
Renaming Profiles
To rename a profile a user may either select a profile and click the Rename… button, or double-click the name of the profile in the profile list. This will activate a text cursor in the list of profiles and allow the user to type in a new name in-place. When the Enter key is pressed, the new name is used. The Escape key will abort the renaming process and keep the old name.
If the new name is the name of a profile that already exists, the user will be asked if they want to overwrite the already existing profile. If they choose not to, the profile will not be renamed.
Copying Profiles
The Copy button may be used to create an identical copy of a profile. The copy will be named Copy of NAME (where NAME is the name of the profile that is being copied), and will be selected after the copy has been created. The user is free to rename the copy thereafter.
Deleting Profiles
After selecting a profile in the Manage Profiles window, clicking the Delete button will delete the currently selected profile. The user will be asked if they are sure if they want to actually delete it.
If the current default profile is deleted, the first profile in the list will be the new default profile.
Connecting to Profiles
The top of the device connecting screen holds the area the user can select a profile to connect to:

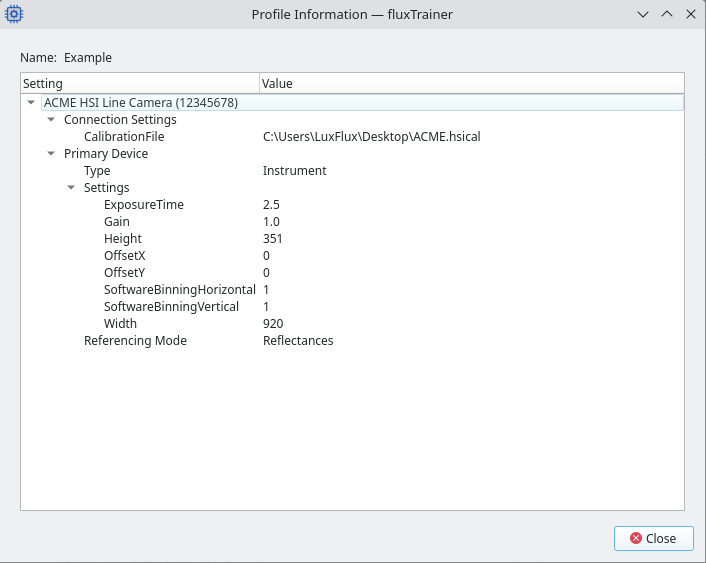
The drop-down contains a list of all available profiles. By default will the default profile be selected. Clicking on the Info button will show the contents of the profile, in the same manner that is displayed when using the Manage Profiles window:
The Connect button may be used to connect to that profile.
Note
Connecting to a profile will disconnect all previously connected devices. (fluxTrainer will ask the user if any devices are already connected when the user clicks on the Connect button for a profile.)
After clicking the connect button, the device connection screen will immediately disappear. On the left side the devices that are being connected will appear, and in the main area a message will appear indicating that devices are currently being connected from a profile:
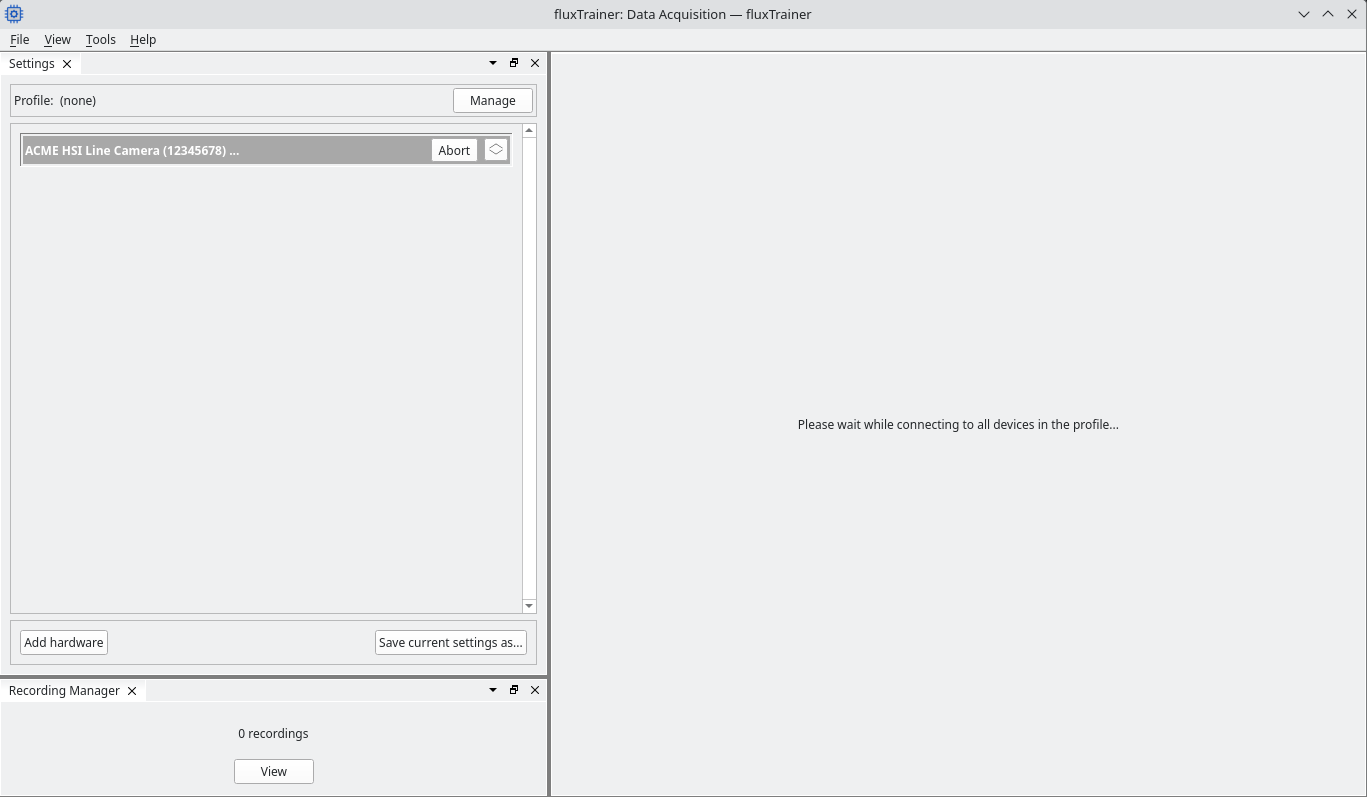
This is in contrast to when connecting a device explicitly, as that will keep the device connection screen open.
After a device has connected, fluxTrainer will then apply the settings of that device that were stored in the profile. For example, if a specific exposure time was set for the selected camera, that setting will be applied to the camera during the profile connection process.
Once all devices of the profile have been connected, fluxTrainer will switch to the instrument view.