Settings
fluxTrainer has many settings that allow the user to customize its behavior. They can be accessed via the Tools menu by selecting Options. (On macOS the settings are accessed via the Apple menu instead.)
The settings window constists of multiple tabs for the different setting categories.
Processing Threads
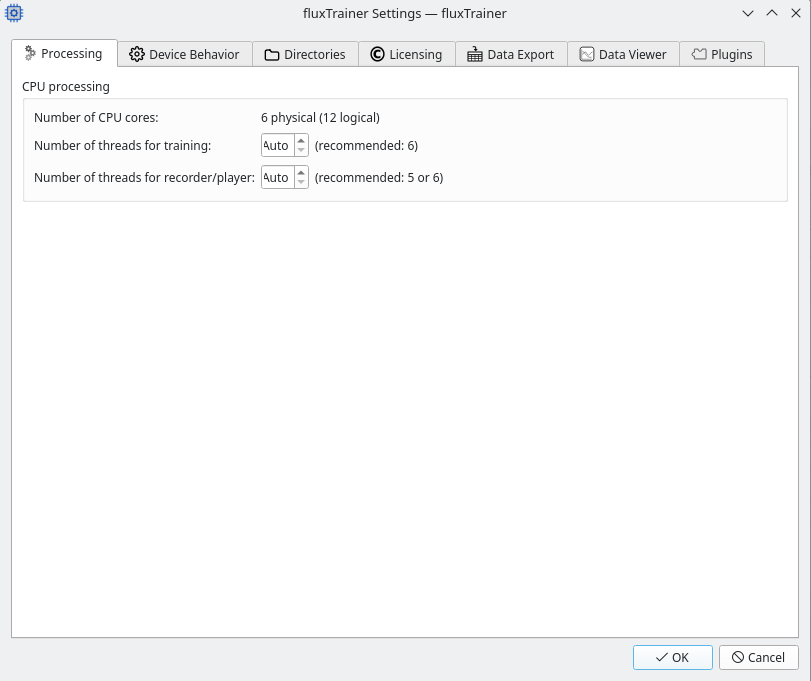
In this tab the user can influence the number of threads fluxTrainer should use for various tasks. At the top it shows how many CPU cores could be detected in the system. (Logical cores refer to cores available via technologies such as Intel’s Hyper-Threading (HT) or AMD’s Simultaneous Miltithreading (SMT).)
The user can influence the number of threads that should be used to process the data in fluxTrainer. The Number of threads for training specifies the number of threads that participate in all operations that occur while in the Data Viewer. The Number of threads for recorder/player specifies the number of threads to use for processing data obtained from connected devices.
By default both settings are set to Auto, which will automatically select the number of physical CPU cores as the number of threads to use.
Note
The recorder/player should not be open and/or active while changing the number of threads for the recorder/player.
Device Behavior
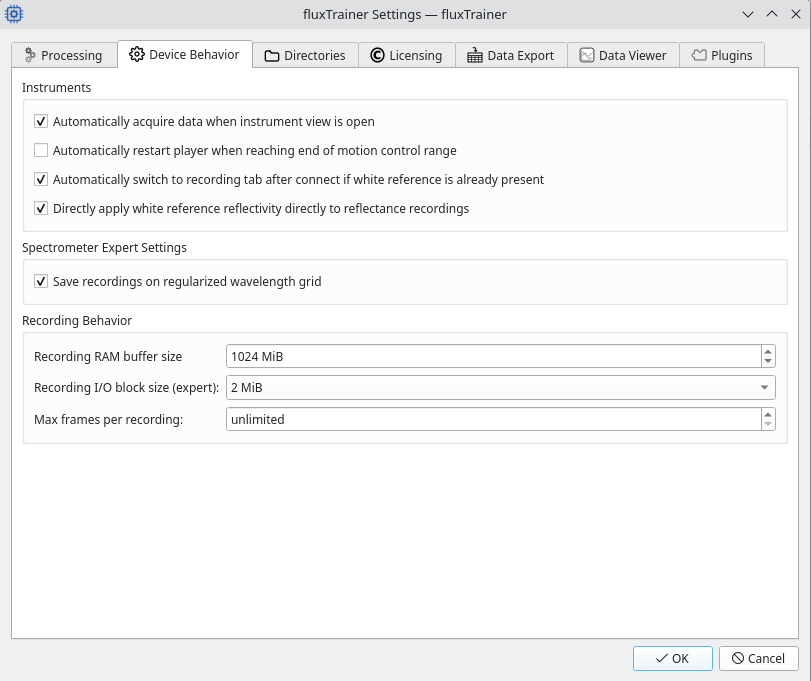
This tab influences the behavior of the recorder/player.
Automatically acquire data
If Automatically acquire data when instrument view is open is set (default) then if a device (such as a HSI camera) is connected, data acquisition is started automatically and the user does not need to do so manually. This streamlines the user interface.
If this is disabled then the user must explicitly press a start acquisition button to start acquiring data from a device, and there will also be a stop acquisition button to stop the acquisition if it is currently active.
Automatically restart player
If Automatically restart player when reading end of motion control range is set, the player will automatically start again when once it reaches the limit of motion control position.
This option is useful for a “demo mode” that constantly travels between both ends of the motion control device while processing the data provided by the instrument device with the selected model.
Automatically switch to recording tab
Normally after connecting a device the Calibration view will be open. However, when connecting a profile that includes a white reference that was stored on disk, or when connecting to a device that contains a factory-provided white reference, it might not be necessary to perform any calibration operations. The Automatically switch to recording tab after connect if white reference is already present option tells fluxTrainer to automatically switch to the Recording view after connecting a device in that case. (If the white reference is missing after connecting a device, fluxTrainer will remain in the default Calibration view.)
Directly apply white reference reflectivity
When saving recordings a reflectances, if the user provided a reflectivity curve for the white reference material, there are two different ways the recording can be saved: either the white reference reflectivity curve is stored as metadata within the recording, or alternatively it is applied directly to the data (and the data corrected by that curve is stored on disk).
When storing the curve as metadata it is likely that only fluxTrainer will be able to properly read such a recording. When storing it directly applied to the reflectance values, then any software that supports the target format will be able to read the correct values.
Note
This setting has no effect if the user chooses to store the recording as intensities with a separate white reference. In that case the white reference reflectivity curve will always be stored as metadata.
Spectrometers: save recordings on regularized wavelength grid
When a spectrometer is connected, and that spectrometer provides metadata that contain a normalized wavelength grid for the spectrometer product family, if this option is enabled the wavelengths will be normalized to that regularized grid. Otherwise the wavelengths of the spectrometer will be used directly, which will vary from device to device due to manufacturing tolerances.
Note
This setting has no effect on recordings of hyperspectral cameras. It is only relevant for spectrometers.
Recording RAM buffer size
This setting allows the user to specify how much RAM the recording mode should reserve when performing a recording. When recording data from an instrument device (such as a HSI camera), the data is first written to the specified RAM buffer, and a separate thread in the background writes the contents of the buffer to disk.
A large enough RAM buffer ensures that disk latency issues will not cause the recording to drop frames.
If the disk that the recording is written to is on average fast enough to write away all data that is being recorded, the precise size of the RAM buffer is not as important, as long as it is large enough to smooth out any I/O latency issues. The default 1 GiB is a good value for that.
If the disk that the recording is written to is slower than the rate the data is being recorded (for example because the recording is written to a network drive), it is recommended to increase the RAM buffer size so that it can hold the size of a typical recording, at least if the system as enough RAM available for that. Never set a buffer size larger than the amount of available RAM though, as even in the best case that will significantly worsen the performance of the recording.
Note
This is not relevant for / applicable to the special 2D recording mode.
Recording I/O block size
When the contents of the RAM buffer is written to disk, it is done in blocks of the size specified by this setting. The default value will be reasonable for many systems, but in some cases expert users might want to alter this to achieve the best possible performance on their specific configuration.
Note
This is not relevant for / applicable to the special 2D recording mode.
Max frames per recording
When this is not set to unlimited (the default), whenever a recording has reached this number of frames, the recording will be stopped as if the user had stopped it explicitly.
This avoids the situation where the user may press record, have a very large hard disk as the recording target, and forget to stop the recording. That may easily produce recordings that are too big to be loaded back.
Note
This is not relevant for / applicable to the special 2D recording mode.
Directories

This tab allows the user to specify directories that will be used by fluxTrainer for various purposes. Click the … button to open a directory selection window, and select the corresponding directory from there.
Recording Directory
This directory is used for two purposes:
When a recording is made it stores hidden temporary files that contain the data of the recording while the recording is active.
When a user opts to save recordings this will be the default directory that is offered as a target.
Default audit directory
When using audit sinks this directory will be the default directory that is used to store the files generated by the audit sinks.
Licensing
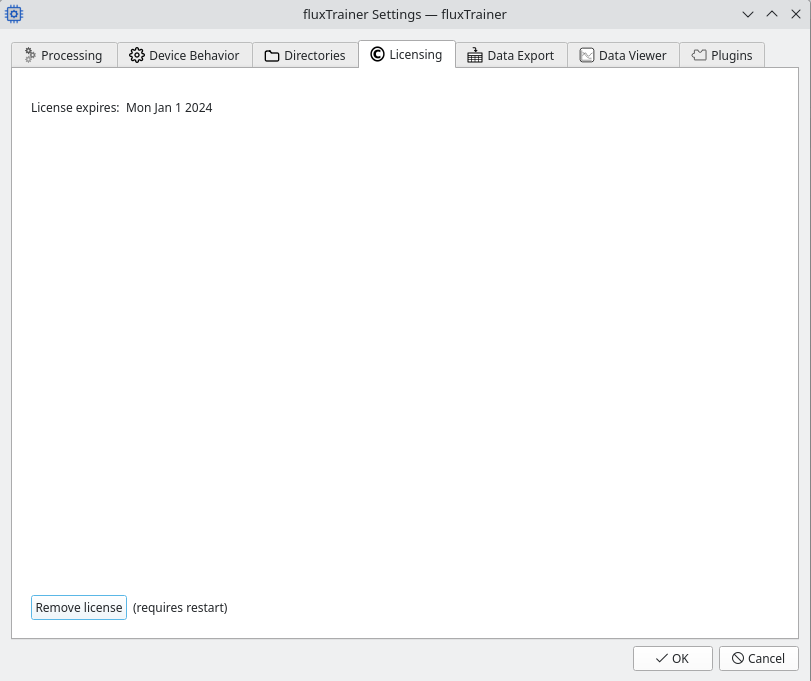
This tab shows basic information about the current license, such as its expiry date.
Pressing the Remove license button at the bottom will cause fluxTrainer to forget the license file it is currently using. Restarting fluxTrainer afterwards will cause fluxTrainer to prompt the user for a license file again. This allows the user to specify a different license file.
Data Export
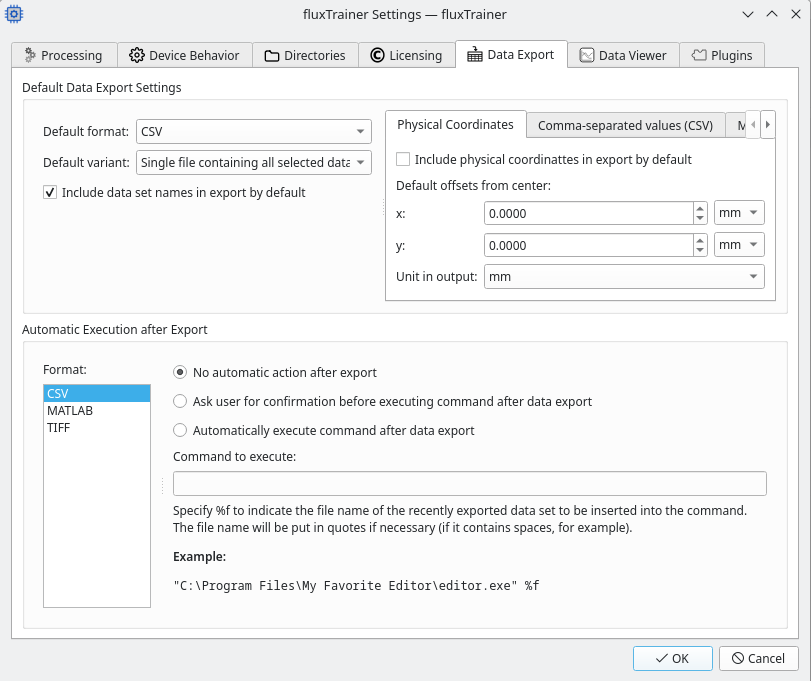
In the top half of this tab the user can configure default settings for the data export window. Please refer to the documentation of that window for details on the meaning of the individual options.
In the bottom half of this tab the user has the option to automatically execute a command once the data export has completed. For example the user can configure to automatically open exported CSV files in their favorite spreadsheet program once they have been exported.
The commands to execute can be defined on a per-format basis. By default no action is taken after exporting the data (and the files are just saved). Otherwise the user can specify a command to execute once the export has completed. Optionally the user can tell fluxTrainer to ask for confirmation after every export, because they may not want to execute the specified command for all exported files.
Note
If the user exports datasets into multiple individual files, the command will be executed once per generated file. In a project that has 20 cubes loaded, and the user decides to export data into one dataset per file, the specified command will be executed 20 times, one for each output file.
Data Viewer
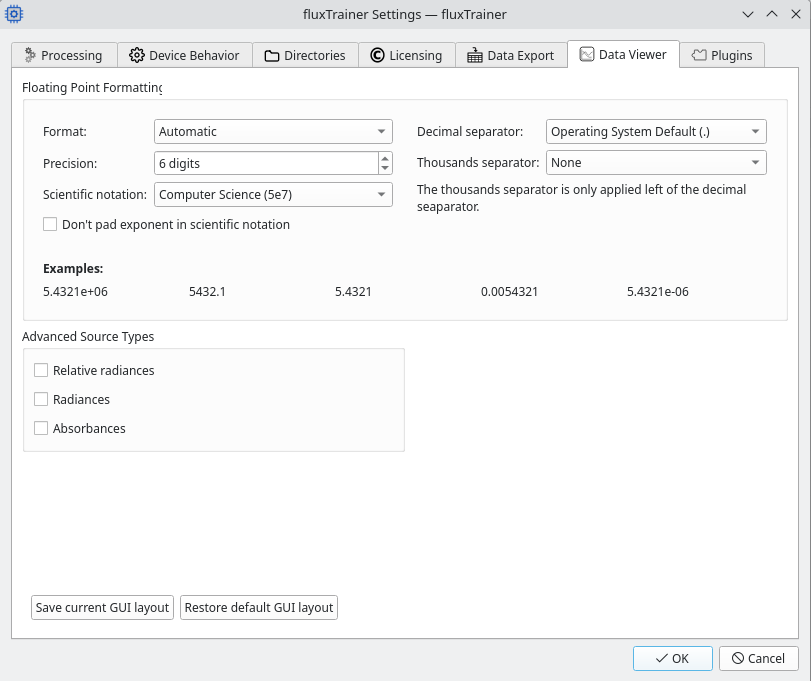
This tab allows the user to configure various aspects of the data viewer.
On the top the user can configure how floating point numbers are displayed in the data viewer. This will affect the table view and the various plots. By default no thousands separator is used and the decimal separator is taken from the current operating system setting.
Below that the user can enable additional value types that are not displayed by default when changing the value type of a source. Since most users will only ever need Intensities and Reflectances, the more advanced value types are not displayed by default, but can be enabled here.
At the bottom there are two buttons that influence fluxTrainer.
Save current GUI layout
If the user has rearranged the dock widgets in the Processing Chain and Data Viewer tabs, this setting can save the current arrangement. When fluxTrainer is started again the saved arrangement will be used.
Note
This does not affect the recorder/player functionality.
Restore default GUI layout
If the user wants to return to the factory default of the GUI layout of fluxTrainer, use this button. It will not have an immediate effect, but upon restarting fluxTrainer the GUI layout will be the factory layout again.
Plugins
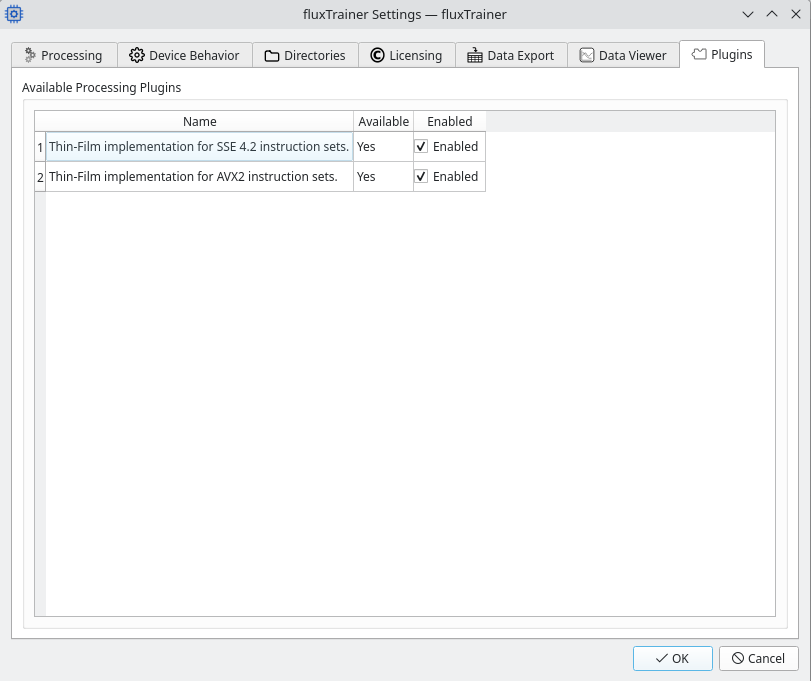
fluxTrainer may come with various plugins that improve its functionality. For example it may come with plugins that make use of specific instruction sets not available on all CPUs. If the current CPU used to run fluxTrainer supports those instructions, the plugins provide certain algorithms optimized for these more advanced CPU instruction sets, improving the performance of the algorithms.
It some cases the user may want to disable these plugins. For example, in some cases the usage of some instruction sets will cause the CPU clock speed to reduce significantly, especially on specific models. The advantage of using the faster instructions might be mitigated by the much lower clock speed. (Typically this will not be the case though, which is why all plugins are enabled by default.) In that case it may be useful to disable the corresponding plugins, which can be done here.